
Need to make a fresh start, but not sure how to delete your old data. This post elaborates on how to delete a company in QuickBooks Online and Desktop to start over again.
QuickBooks is an incredible accounting software best fitted for small to medium-sized businesses. You can handle your business accounting tasks and store your crucial financial data in a QuickBooks company file. You can use this company file to store, access, and share your financial data with other workers. However, there are instances when you no longer need your company file in QuickBooks and want to delete it. In this post, we will discuss the procedure to delete a company file in QuickBooks by applying a few simple steps.
Read Also:- QuickBooks Data Recovery
What is a QuickBooks Company File? Explained
Before getting started with QuickBooks, you need to create a company file with .QBW extension. The company file in QuickBooks stores the financial information about the company. When you create a company file with a name, the file will look like – Companyfilename.QBW. You may find other corresponding files in the same folder having the name of your company file; however, their extensions are different, such as .QBB, .QBM, .QBO, etc. You can consider creating a backup of your data file in case you need your data back.
Accept credit card payments where you do business – in the back office, in your retail store, on your website, or on your mobile device. QuickBooks Services

How To Delete A Company In QuickBooks Online?
You can delete your company file in QuickBooks Online by implementing a few simple steps. However, before you proceed any further with the task, you need to ensure a few important pointers that are explained below:
- First things first, you need to make sure that you are signed into QuickBooks Online with admin credentials. It will help you to make crucial changes, such as deleting your company.
- The process will purge the data imported from QuickBooks Time as well.
- In case you are using QuickBooks Online Accountant, avoid these steps. You can import a blank QuickBooks file and start over.
Steps To Delete The Company File
After considering the above-listed important points, you can move ahead and perform the steps. The steps depend upon your QuickBooks subscription. The steps are different for 60 days or less and that for more than 60 days. Let’s cut to the chase and follow the below-described steps to delete a company file in QuickBooks Online.
Case 1: If The Company File is Less Than 60 Days Old
If it’s not been 60 days since you started using your company, then the below-listed steps can help in deleting your QuickBooks Online company file. But before that, you need to make sure that your company file is ready for this process. You need to check the following considerations:
- If you have third-party applications or financial institutions connected to QuickBooks, deleting your company will damage these connections.
- Your QuickBooks Online or payroll subscriptions will remain intact; however, your books will be completely wiped out. If you want any historical data or employees in your company, you need to re-enter it into the company.
Delete The Company File Data
Now that you are sure about your company data, below are the steps elaborating on how to delete a company in QuickBooks Online:
- Sign into your QuickBooks Online account as an administrator. In case you are already signed in, check and confirm the file you want to delete from within the QuickBooks Online application.
- Next, click on this link, and it will redirect to a page wherein you will be able to locate the list of the items you want to purge.
- Once selected, click Yes and hit the OK button to confirm it.
- After confirming the selection, click the Wipe Data option, and the selected data will be wiped out.
- Once the deletion of the company file is completed, you will be redirected back to your QuickBooks Online home page.
Case 2: If Your Books Are 60 Days Or Older
In case you are using your company file for over 60 days or more, you need to cancel your current QuickBooks Online company and start a new one. Below are the steps:
First Step: Cancel Your Current Company
In the first place, you need to cancel your QBO account. Besides, if you have an active QuickBooks Payroll subscription, then you need to cancel it as well before getting started. Cancelling QuickBooks Online doesn’t delete your accounting data. Canceling your account means you will have read-only access to your company information. You can delete your data permanently from the Intuit Account Manager.
Second Step: Delete Company Data Permanently From Intuit Account Manager
Deleting the data will also cancel all your subscriptions and licenses as well. Your personal data shared with Intuit will also be deleted. You may not be able to get your data back after deleting it. Implementing the below-given steps, you can delete your data permanently from within Intuit Account Manager:
- Start the procedure by signing into the Intuit Account Manager.
- Once you are in, select the Data Privacy option.
- Once done, select the Delete button in the given section.
- Moving ahead, select Continue to confirm the deletion.
- Once you are done with your part, it can take up to 90 days for the data deletion.
- Avoid creating a new Intuit Account using the same email address during this period, or you will end up losing your new data as well.
How To Delete a Company File on QuickBooks Desktop (Pro/Premier/Enterprise)?
Now that we have discussed the steps on how to delete a company in QuickBooks Online follow these steps to get it done for QuickBooks Desktop:
- Launch QuickBooks, to begin with the procedure.
- After that, open the file that needs to be deleted.
- Locate the File option and click the Open or Restore Company option and jump to the next step.
- Moving ahead, click Open company file and click the Next button.
- Click the required File and select the Open option.
- Thereafter, click the F2 button, and it will open the Product Information Window.
- Now, find the file information tab and jot down its location.
- The noted location depicts the path of the File storage in your device.
- After noting the location, you can close QuickBooks.
- The next thing you need to do is to click File, followed by clicking on the Exit button.
- Navigate to the location you have noted in the previous step.
- Once the file is found, right-click on it and hit the Delete option from the drop-down.
- Verify that you have deleted all the files with .QBW extension.
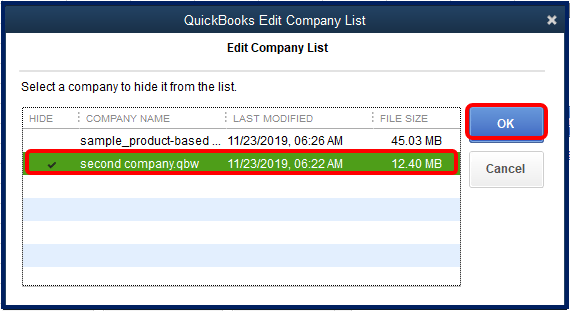
- Re-launch QuickBooks and choose the Edit list option.
- Mark the checkbox against the Hide field on the deleted file.
- Once you complete this process, it gets hidden in the Windows, labeled No company open.
How To Delete a Company File on Mac?
To delete a company in QuickBooks Desktop for Mac, you can find easy steps like other versions of the program. In the first place, you need to locate the file from the hard drive. Thereafter, you can delete it with a few simple steps stated below for you:
- Open QuickBooks on your Mac device and then discover the file you want to delete.
- Moving ahead, locate the Help option and choose the Product information option.
- Now, navigate to the bottom of the file location when a new screen appears.
- Once you see the file path, copy it using your mouse and take note of it.
- After noting it down, click the top left corner cross to close the active Window.
- Using the file location, you can locate and click on the company file you want to delete.
- Once selected, drag it to the trash bin to accomplish the task.
- You need to delete the File, including incorporating the disk image of the deleted company file. Check and verify that its extension is .dmg.
Important:
QuickBooks Mac creates a backup of the latest updated data when a new modification is done in the company file. You can disable it from within the Preferences section by switching off the auto-backup feature.
- Once the file is added to the trash bin, you can delete it permanently by deleting it from the trash.
- Delete the complete File from the trash to get this task accomplished.
Final Words!
This post explains the procedure to delete a company in QuickBooks – both Desktop and Online versions of the program. The steps explained in this post, when cautiously implemented, can get the task accomplished. However, if you are finding it difficult to execute, feel free to connect with an expert and get it deleted with ease.
Read also : How to Reconcile in QuickBooks Online
Frequently Asked Questions
Question 1. How To Create a Back Up Of The QuickBooks Company File?
Answer. In QuickBooks, you can save a backup of your company data and protect it from any kind of loss or damage. If you don’t want to deal with the data loss, you can save a backup of the company file using the below-described steps:
- In the QuickBooks application, navigate to the File menu and hover your mouse over the Back up Company option.
- Hovering will enable you to select Create Local Backup option.
- Moving ahead, select Location Backup and hit the Next button.
- When in the Local Backup Only area, use the Browse option to select a location for backing up your company file.
- Here, you can set the number of backups you want to keep for the company file. However, this section is optional.
Question 2. How to restore a backup of your company file?
Answer. You can locate the backup file in QuickBooks with .QBB extension. Once the backup file is located, you can click Open or Restore Company > followed by > Select Restore a backup copy option to get the backup restored.
Qustion 3. What are various issues related to the company file in QuickBooks?
Answer. When accessing the QuickBooks company file, you may experience trouble due to multi-faceted reasons. A wide range of issues related to the company file are covered in the error code series 6000. A damaged path or corruption in the data file can be some of the apparent reasons behind the error.

