Have you been struggling while trying to reconcile in QuickBooks? If that’s the problem, you don’t have to take stress on your shoulders. Here, in this write-up, you will get all answers regarding how do you reconcile in QuickBooks and what you mean by reconciliation. By reconciling in QuickBooks Online, you can tally your bank statement with the one listed in QuickBooks. Thus, it will help you detect errors like double payments, missed payments, calculation errors, etc.
Facing issues while trying to Reconcile in QuickBooks Online and need instant help? Contact us at +1(833) 460-2030, and our highly-trained professionals will assist you in the best possible manner.
What Does Reconcile Mean in QuickBooks? – Briefly Explained
Reconciliation is the process that companies mainly use to ensure that your general ledger balance tallies with that one that is listed in your bank statement. This process is done by noting the discrepancies found between the two accounts, spotting the missing data, and making any other changes to the general ledger. After this, to prevent the mismatching of accounts, it is mandatory to compare each transaction with another one entered into QuickBooks Online.
Then, if you spot that everything matches, you can estimate that the accounts are balanced and accurate. If you spot any entry in QuickBooks but not in your bank account, then it could be a sign of a mistake or any fraudulent activity.
Accept credit card payments where you do business – in the back office, in your retail store, on your website, or on your mobile device. QuickBooks Services

Tips You Must Consider While Reconciling in QuickBooks Online
Before you move further with reconciling in QuickBooks Online, there are few points you must keep in your mind.
- You must always begin with the first bank statement.
- Spot the exact difference between both accounts.
- Examine the information on your bank statement in QuickBooks.
- Also, try to balance one single transaction at a time.
- Review the unmarked transactions.
- Moreover, you must ensure that your opening balance must be accurate.
Instructions To Reconcile in QuickBooks Online Seamlessly
Many times, the question might arise in the user’s mind how do I reconcile in QuickBooks Online? To answer this question, we have provided the proper stepwise instructions to accomplish the task. Read all the pointers carefully and get your accounts reconciled without making any errors.
Phase 1: Evaluate Your Opening Balance
You are supposed to examine your opening balance when reconciling the account for the first time. Also, you must verify that the beginning balance must be equal to the balance of your real-life bank account since the day you choose to begin tracking in QuickBooks. Just, in case, you don’t remember to include an opening balance in QuickBooks in the past, then you will be allowed to add the amount later on.
Note:- You will get the option of adding the service charge and interest-earned options only if the bank account isn’t linked with online banking.
Phase 2: Commence with the Reconciliation Process
You can initiate the reconciliation process after having monthly or credit card statements. For instance, if you wish to reconcile for more than one month, then you have to do one statement at a time, and you have to begin with the older statement. Furthermore, have a look at the steps illustrated below to reconcile the bank statements in the QBO application.
- As long as you are linked with online banking, assure that you match and organize all of your downloaded transactions.
- Soon after this, navigate to the Settings menu, followed by Reconcile option. For first-time users, you must pick the Get Started button.
- Next, go to the Account drop-down menu and pick the account you want to reconcile. While choosing the account, cross-check that you have chosen the same account that is listed on your statement.
- Now, you must go through your Beginning Balance and ensure that the beginning balance in QBO tallies with the one that is mentioned in your statement.
- In the next step, you are supposed to include the Ending Balance and Ending Date on your statement. Note:- Some financial institutions recognize the ending balance as a “New Balance” or a “Closing Balance”.
- If you spot the Ending Balance, have a look at the Last Statement Ending Date. This is mainly the end date of your last reconciliation. Moreover, you will also see that your current bank statement must tally till the time you start the day after.
- Once you have added all the details to start, choose the highlighted Start Reconciling option.
Phase 3: Tally Your Bank Statement With QuickBooks
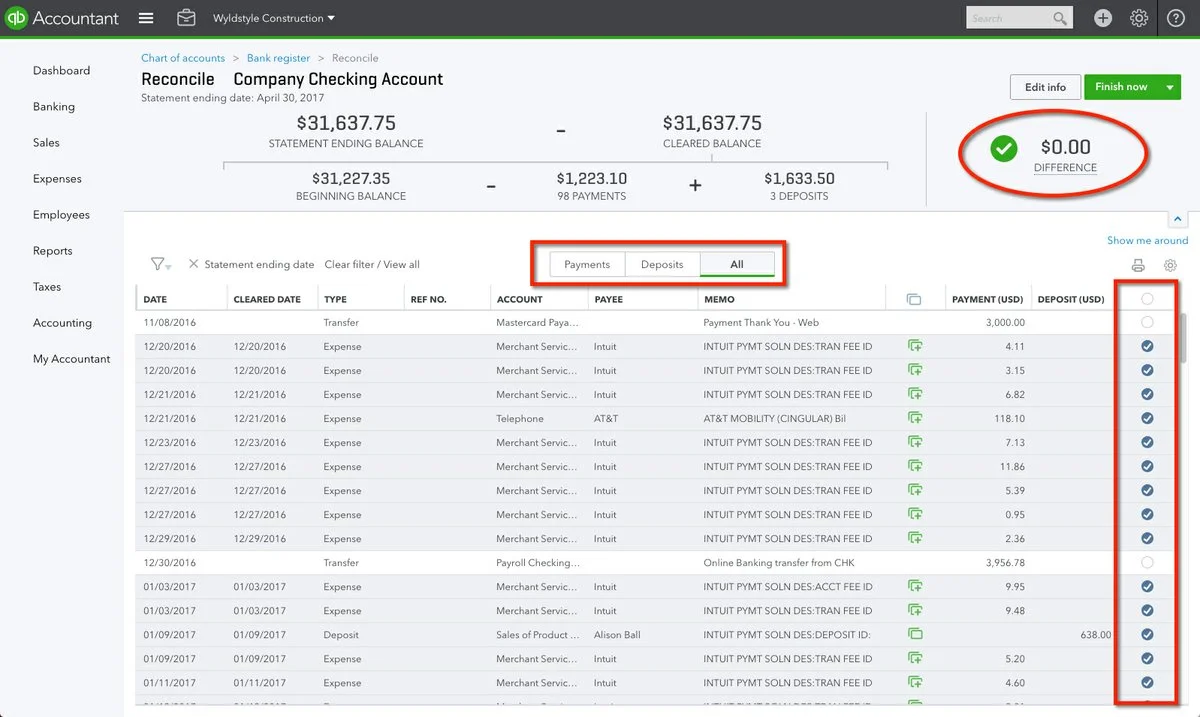
Once the reconciliation process is over, all you need to do is to tally the transaction listed on your statement corresponding to the one mentioned in QuickBooks. Drag your cursor over them one after the other, and you must verify that you have added the appropriate dates along with the transactions in QuickBooks. Doing so will help you in recognizing whether all the transactions tally.
Reconciliation of Accounts Affiliated to Online Banking
As all the details of your transactions are automatically transferred to your bank, so reconciling should be a breeze. However, there are certain scenarios when your accounts are already balanced. Furthermore, if you wish to reconcile the accounts connected with online banking, carry on with the following procedure.
- Initiate the process with the very first transaction listed on your statement.
- Soon after this, you must look for the same transaction in QuickBooks as well.
- Now, you must tally both of the transactions. If you spot that both the transactions tally, place a tick-mark beside the amount mentioned in QuickBooks. This will signify it as reconciled. To do the things faster, the transactions that you have included or tally from online banking has already been selected for you.
- For instance, if you discover that the transaction isn’t present on your statement but you can see it on QuickBooks, then don’t mark the checkbox.
- Moving further, you must match every transaction on your statement to that listed on QuickBooks. Tip: For instance, if you have found the perfect match but something is missing like the payee is missing. In such a case, choose the transaction in QuickBooks to expand the view and then hit the Edit button.
- Once you finally come to an end, the difference between your statement and QuickBooks must be $0.00. If it is, then choose the highlighted Finish Now button.
Procedure to Reconcile the Accounts that Aren’t Affiliated with Online Banking
On the other hand, if you aren’t linked with online banking, then you must implement the following steps.
- Begin the process from the very first transaction on your statement.
- After this, you must have a look for the same transaction within the Reconciliation window in QuickBooks.
- If you won’t be able to view the transaction on your statement, but it appears in QuickBooks. In that scenario, you won’t need to place a tick-mark next to the checkbox.
- Now, you must tally every transaction on your statement corresponding to that listed in QuickBooks.
- Once you come to the end, you will spot that the difference between your statement and QuickBooks must be $0.00. If it is, then hover your cursor over the Finish Now button.
Phase 4: Go Through Your Past Reconciliation
Now, you can easily run the past reconciliation report to review your work. For that, you must carry on with the steps instructed below.
- Begin the process by tapping the Bookkeeping or Accounting option, whichever is available.
- Afterwards, navigate to the Reconcile option and hit the highlighted History By Account option.
- Now, you must make use of the drop-down menu to pick the appropriate account and date range. Otherwise, you may print or export your reconciliation reports if you wish to share them.
Final Thoughts!!
We hope that now you have got to know about how to reconcile in QuickBooks Online. If you find yourself stuck at any stage while reconciling accounts, consult with our professionals without hesitation via the live chat facility. They will help you in the best possible way to solve your query.
Frequently Asked Questions (FAQ’s)
Question 1. What are the benefits that you can avail with Reconciling accounts in QuickBooks?
Ans. By reconciling the accounts in QuickBooks, you can fulfill the following goals.
- You can record all your banking transactions.
- By reconciling the accounts, you can spot the difference between your bank and QuickBooks.
- It also helps to ensure that all the transactions have been entered accurately.
Question 2. How frequently must you reconcile the accounts in QuickBooks Online?
Ans. It has been suggested that you must reconcile the checking, savings, and credit card accounts every month. Doing so will help you find the discrepancies between the accounts so that you can easily reconcile the accounts at the end of the accounting period.
Question 3. How many reconciliation can you undo within QuickBooks Online?
Ans. The users can undo only one transaction at a time in QuickBooks Online. For instance, if you wish to begin it from scratch, then consult with your accountant. This is so because only the accountants can undo the complete reconciliation.

