Do you want to run the QuickBooks company file in multi-user mode? In that scenario, the users must ensure they have installed the latest QuickBooks Database Server Manager version on their workstation. It is a utility program that enables the users to share the company files with other computers available in the network. Moreover, this tool is perfect for users who wish to work in a multi-user environment.
However, before using the utility, it is a must to get the QuickBooks Database Server Manager latest version installed on your system. Continue reading this post and get all the relevant details to download, install, update, setup, and use the QBDBMgrN on your device.
Are you facing issues while trying to setup QuickBooks Database Server Manager? Well, in that case, you must talk to our professionals by dialing Call Us : +1-888-209-3999 and get your issue resolved within no time.
What All You Need to Know About QuickBooks Database Server Manager?
The QuickBooks Database Server Manager is also called a personal database management tool and part of the QuickBooks Desktop application. Moreover, this utility also prepares the .ND files for any company file on the host computer.
Above all of these, the most important thing is that the users won’t be able to access their company files in multi-user mode without getting the Database Server Manager on their device. To gather more details regarding the setup and use of this utility, stick to this post till the end.
How Can You Access the QuickBooks Database Server Manager Features?
Database Server Manager has numerous features. However, to access those features, we have provided the steps below. Check them out.
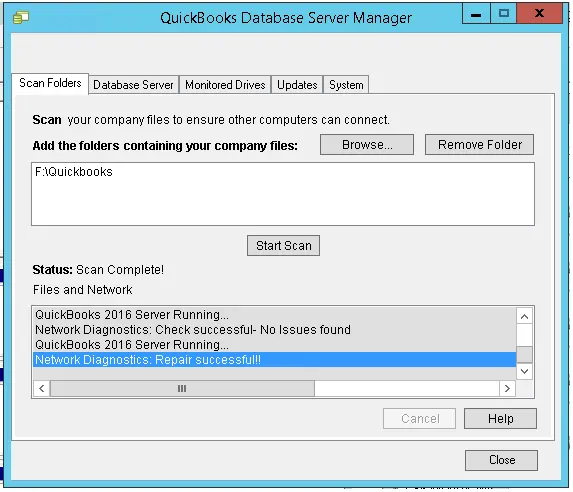
- Scan Folder Features-
Scanning the company files in QuickBooks makes it more convenient to work in multi-user mode.
- First of all, you must run the QuickBooks application and then access the database server manager.
- You should click the Scan Folders button and include the folder by tapping the Add Folder button.
- Now, you must scan the entire folder if you face issues finding the relevant one.
- Afterwards, the users can easily delete the added folder by selecting the Remove Folder option.
- Now, move towards the Scan button and wait until the scanning process is over.
2. Database Server Features:-
You will learn about the following things by accessing the Database Server features.
- You will learn about the number of users who have signed in to the QuickBooks company file.
- Also, the users can easily connect the data file with the server.
- It also presents you with the status of the services associated with the QB Database Server Manager.
- Moreover, you will also get the Services Administrative option to make changes in the Services Status and then configure the services such as QBDBXX.
3. System Features:-
This feature will help you grab the information where the tool is located. However, to know more details, have a look at the process below.
- Initially, hit the Windows key and select the highlighted Programs option.
- After this, pick the QuickBooks option followed by the QB Database Server Manager.
- In the next step, you must opt for the System tab and then hit the System Information.
- Ultimately, you will obtain all the details regarding the system on which the database server is install.
4. Updates Feature:-
- To get more details about the update, hit the Windows key on your keyboard.
- After this, navigate to the Programs option and click QuickBooks.
- Thereon, hover your cursor over the Updates option.
- Finally, review all the instructions attentively, which will assist you to complete the procedure.
- Monitor Drive Feature:-
- With the help of this feature, you can keep the QuickBooks Database Server Manager tool updated every time you include new QB files on the server.
- Also, it helps to examine the local drives you have added, removed, or renamed.
QuickBooks Database Server Manager Requirements to Run Application Smoothly
The QuickBooks Database Server Manager requirements is necessary to run the application seamlessly.
- Check that your computer must have a minimum of up to 2.4 GHz processor.
- You must require a minimum of 4GB RAM to run the software uninterruptedly. For a better experience, up to 8GB RAM is mandatory for 1-5 users.
- Moreover, the additional disk space required is 2.5GB for the company files.
- It works well with the US version of the Windows operating system, and the Regional Settings are supported when fixed to English.
How to Install QuickBooks Database Server Manager on Your Workstation?
Go through the following procedure carefully to install QuickBooks Database Server Manager successfully on your device.
Stage 1: Get the Latest Version of QuickBooks Database Server Manager
To get the latest version of the QuickBooks Database Server Manager download, check that you have installed the latest version of QBDT.
- Initially, you must download QuickBooks Database Server Manager from Intuit and install it.
- Afterwards, pick the Installer option, and it will eventually launch the installation wizard on the screen.
- In the meantime, ensure your device is well-connected with a stable internet connection.
- Thereon, you must hit the Next button, and if you are not linked to a stable internet connection, press the No button.
- You must pick the programs and hit Next to proceed further.
- Following this, confirm that you agree to the Terms and Conditions listed in the License Agreement.
- Once you are all set, tap the Next button to end the process. Alternatively, you can also use the QB Database Server Manager from the QuickBooks Tool Hub.
Stage 2: Step-by-Step Instructions to Install QuickBooks Database Server Manager
- To begin the process, you must confirm that you have closed all the open programs on your server computer.
- After this, press the Ctrl + J keys to launch the Download window on your device. Herein, you must look for the downloaded setup file of the QBDBMgrN, represented as “Setup_QuickBooks.exe”.
- Thereon, carry on with the steps instructed on the screen to complete the process.
- If QuickBooks asks you to pick the installation type, you must go with the Custom or Network Options tab and then hit Next.
- Furthermore, you have to pick the best option that suits your network setup and tap the Next button. You can install the QBDBMgrN. But, if you have already installed QuickBooks Desktop on your device, ensure it won’t overwrite any previous company data.
- If you require both Database Server Manager and QuickBooks Desktop on your computer, opt for “I’ll be using QuickBooks Desktop on this computer, AND I’ll be storing our company file here so it can be shared over out network.” However, it has been advised to go with this option.
- Conversely, if you only wish to get the QuickBooks Database Server Manager on your server computer, pick the “I will NOT be using QuickBooks Desktop on this computer”.
- In the end, go through the instructions displayed on the screen. Once you are done, opt for the Install option, and then Windows will prompt you for the permission.
Configuration of QuickBooks Database Server Manager
To set up the QuickBooks Database Server Manager, you must carry on with the procedure explained below.
- Launch the Services window by typing Services into the Start’s menu search column.
- Once the Services window opens, scroll down to list and pick the QuickBooksDBXX service. Here, the version number is represented by XX.
- Soon after this, move to the General section and look for the Service Status. If you notice that the status shows Started or Running, then change it to Stop.
- Afterwards, you must pick the Automatic option from the Startup Type menu.
- Thereon, navigate to Recovery and opt for Restart the Service from every option i.e., First Failure, Second Failure, and Subsequent Failure.
- In the next step, return to the General section and pick the Start option to relaunch the QB Database Server Manager.
Stage 3: Give the Necessary Firewall Permissions
If you don’t have enough firewall and antivirus permissions to run QuickBooks Database Server Manager on your server computer, then assign the required permissions to run it smoothly.
Follow the steps written below to configure the firewall manually.
Include the Firewall Port Exception for QuickBooks
Users with multiple versions of QuickBooks Desktop on the same computer must follow the following steps.
- To commence with, press the Windows key, add “Windows Firewall’ into the search panel.
- Choose the Advanced Settings option from the upcoming window and then move further.
- Thereon, right-click on the Inbound Rules and opt for the New Rule option.
- After that, choose the Port > Next > and confirm that you have selected the TCP checkbox.
- You have to mention the specific ports required according to your QuickBooks version.
- QuickBooks Desktop 2020 and later: 8019, XXXXX.
- QuickBooks Desktop 2019: 8019, XXXXX.
- QuickBooks Desktop 2018: 8019, 56728, 55378-55382.
- QuickBooks Desktop 2017: 8019, 56727, 55373-55377
- Once you have included the port number accurately, hit the Next button.
- Subsequently, go for the Allow the Connection followed by the Next button.
- If required, you must ensure you have picked all the profiles and then move further.
- You must establish a new rule, assign a new name, say, “QBPorts(year),” and then hit the Finish option.
How to Update QuickBooks Database Server Manager Using These Simple Steps?
The users need to update QuickBooks Database Server Manager to the most recently launched version so that they can access its latest features and functions.
- To start the update process, you must access the Download & Updates page using your preferred web browser.
- After this, you must look for the latest version available for QB Database Server Manager and click on it.
- Thereon, users have to wait until the installation process is over and then reboot the server.
- Once you notice that the server is updated on every workstation, you will receive the message indicating: The Company file needs to be updated to work with this “version of QuickBooks Desktop”.
- Following this, you will notice that the updates will modify the database structure, and at that time, you will see the “Create a Backup” option.
- Consequently, this will enable the users to open the file whenever they follow the on-screen prompts after completing the backup.
Read More- Best Ways To Update QuickBooks Desktop to The Latest Release
Learn How to Use QuickBooks Database Server Manager
Are you wondering how to use QuickBooks Database Server Manager on your device? If yes, then follow the steps listed below in the same manner as given to complete the process successfully.
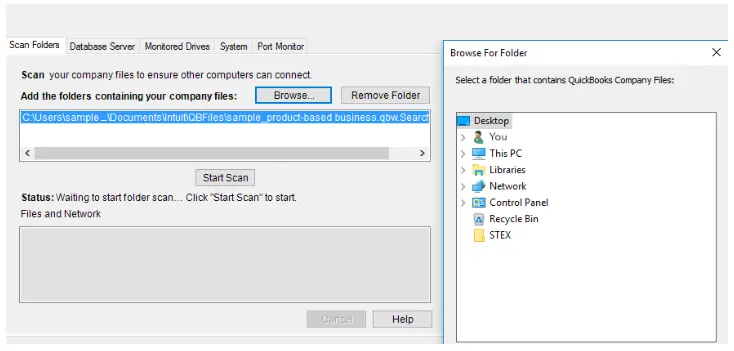
Phase 1: Get Your Folders Scanned
The users have to scan the folders before they share their files. You can scan the folders only once using the steps below.
- Initially, on your server computer, the one that carries your data file, you must launch the Start menu.
- After this, add “Database” to the search column and open the QuickBooks Database Server Manager on your device.
- In the next step, navigate to the Scan Folders tab and click the Browse option.
- Now, the users need to look for the folder that carries your data file (QBW).
- Once you are all set, hit the OK button to proceed further.
- Subsequently, you must tap the Start Scan option.
- Soon after this, once the scanning process is over, the folder will appear in the QuickBooks company files found section. Thereon, you can use your company file in these folders from other network computers.
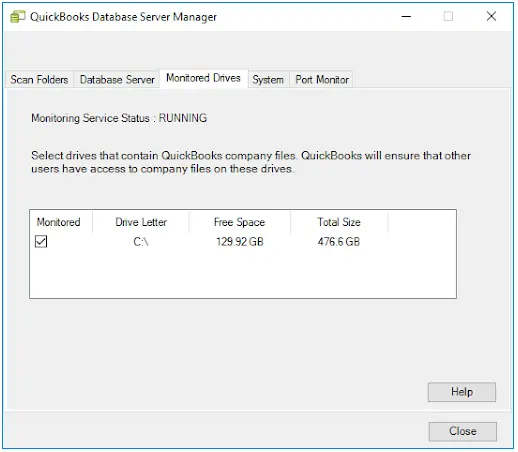
Phase 2: Conduct the Inspection Of Your Drives
Once the scanning process is over, the drive that contains the scan folders will be seen in the Monitored Drives tab. However, to view those folders, the users must select the drive. Furthermore, read the steps below to monitor your drives properly.
- In the initial stage, locate and tap the Monitored Drives tab.
- After this, mark all those checkboxes for the hard drives holding your data files.
Phase 3: Handle the Database Server Manager
The users will get two different tabs in the Database Server Manager that help to run everything seamlessly.
- The first one is the System tab, which describes the location where Database Server Manager is installed on your device.
- Another one is the Database Server tab, which provides you with a clear picture related to the exact status of the tool and the connection with it.
What Should You Do When QuickBooks Database Server Manager Stopped Working?
If you are facing a problem when QuickBooks Database Server Manager stopped working or fails to open, you must restart it on your server computer. Here, we have provided the steps for the current setup; check them out.
In case you have installed both QuickBooks Desktop and Database Server Manager
- To begin the process, you must launch the QuickBooks Desktop application on your server computer.
- Afterwards, navigate to the File menu > Open or Restore Company option.
- Thereon, tap the Open a company file and then launch your file.
- In the next step, ensure you have marked the “Open file in multi-user mode” checkbox and then pick the Open option.
- Ensure that you logged in to your company file accurately using the correct login credentials.
- Once again, you must browse to the File menu and opt for the Close Company/Log Off option. With this, it will shut down your data file on the server.
- Furthermore, press the Windows key on your keyboard, and include “Database” in the search panel. Then, you must try to launch the QuickBooks Database Server Manager on your device.
- If everything is working perfectly fine, you are good to go. If you still get the same error, follow the resolution method below.
If You Only have QuickBooks Database Server Manager Installed
- Primarily, hit the Windows key and then launch the Control Panel on your device.
- Thereon, locate and then opt for the Administrative Tools option.
- Now, you need to pick the Services from the list of options available.
- In the next step, you have to right-click on the QuickBooksDBXX service and choose the Restart option.
Easy Steps to Install the QuickBooks Database Server Manager Linux
Before you begin the installation of QuickBooks Database Server Manager Linux, you first need to check the system requirements to run the program seamlessly.
- In the earlier stage, users must download the Linux Database Server Manager RPM package.
- Now, you must switch to a root user using the steps below.
- The users must open a terminal window on their device.
- After that, include the Sudo Password Root and hit the Enter key to move further.
- The users need to add their user password accurately.
- Thereon, you must review the integrity of the package with the GPG public key. Ensure you have downloaded the Public key on your Linux server and then launch the terminal window. Later on, add the “rpm –import qbdbm-pubkey.asc” and hit the Enter key. If you see that the command represents “gpg ok,” you need to proceed further.
- Within the Terminal window, include “rpm -ivh packagename” and hit the Enter key.
- You must construct a Directory to save the QuickBooks data file and proceed further.
- Lastly, copy the QuickBooks data files to the newly generated directory.
Final Thoughts!!
The users can now easily access their company files in multi-user mode with the QuickBooks Database Server Manager installed on their devices. We hope you find this post helpful in setting up this utility on your workstation. However, if you encounter any issues while using it, contact our professionals anytime at Call Us : +1-888-209-3999 for quick resolution.

