Whenever the tax season arrives, the stress of the business owners increases as they have to prepare and file the taxes alone. But, with the QuickBooks application, users can easily compute and file their taxes without worrying about paying penalties for late filing. Now, the users can easily print form 1099 and 1096 in QuickBooks to report various types of incomes, comprised of freelancing payments and rents.
However, if you are also struggling to Print Form 1099 and 1096 in QuickBooks Desktop, you have reached the right place. Thoroughly review this comprehensive post and print your tax forms easily without making much effort.
Don’t know how to print forms 1099 and 1096 in QuickBooks? In that scenario, you must talk to our highly certified professionals at Call Us : +1-888-209-3999 and let them handle the problem independently
Here’s How To Print Form 1099 and 1096 in QuickBooks Desktop
The steps to print forms 1099 and 1096 in QuickBooks Desktop, Online, and Contractor payment may vary. So, we have listed the procedure for all of them below. Check them out to print the forms hassle-free.
Learn How to Print Form 1099 in QuickBooks Desktop
You are supposed to follow the instructions to print the form 1099 in QuickBooks Desktop accurately.
Stage 1: Get the Latest Version of QuickBooks Desktop
Getting the most recent version of QuickBooks Desktop is necessary to easily process 1099-NEC and 1099-MISC forms.
Stage 2: Construct a 1099s Form in QuickBooks Desktop
Look at the steps below to prepare a 1099s form in QuickBooks Desktop.
- To begin the process, go to the Vendors section, wherein you must opt for the 1099s Forms.
- After that, pick the Print/E-file 1099 Forms option and then schedule the backup of the forms.
- Thereon, choose the Get Started option next to the 1099 form you wish to establish. However, if you wish to construct both 1099-NEC and 1099-MISC forms. In that case, users are supposed to repeat the steps for another form.
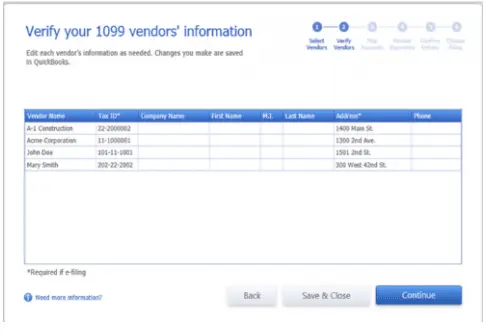
- You are supposed to opt for the vendors that require a 1099 form and hit the Continue tab.
- Confirm that the vendor information you mentioned is accurate. If you find the information entered is inappropriate, you can change it and save it by hitting the Continue button.
- The users must trace the vendor payments account by clicking Apply Payment in this 1099 box section.
- Now, all you need to do is to verify your payment details for exclusions.
- Thereon, go through the Vendors and amounts the users need to report and then hit the Continue button.
- Next, you need to e-file your 1099 s form using the steps discussed further.
Related article- How To Fix when QuickBooks Not Printing Checks?
Stage 3: Importing All Your Data to the Tax 1099 Form
Now that you have created the 1099 form in QuickBooks, you must tap on the E-file button. Then, you must follow the instructions on the screen to import data to your Tax 1099 account.
Stage 4: E-filing of 1099s Form in Tax 1099
Once you have imported all the data into the Tax 1099, you will find the list of vendors, amounts, and boxes.
- Initially, you must either pick the vendor’s name or the Edit option to change the vendor or box information.
- After this, if you have to file the 1099 form with your state, add the proper details within the required text field.
- Choose the vendor you wish to add to the e-file by selecting the checkbox and hitting the Next button.
- You must pick the vendors by selecting the checkbox beside the Date column. Also, you must decide which copies you wish to send to the recipient/vendors by choosing the checkbox beside the USPS Mail or Email Recipient.
- However, if you wish to file with your state, pick the appropriate option and click Next or Calculate Tax1099.com Fee to see the total filing fee.
- Once you have chosen the appropriate option from the Select Forms page. After this, ensure that you have added the payment details appropriately, and choose the Pay & Submit option to e-file.
- If you wish to prepare 1099-NEC and 1099-MISC, follow the same instructions for another form.
Stage 5: Review Your Filing Status
Once you have submitted your 1099 form to the IRS, turn it back to your account to verify the filing status.
Stage 6: Print Your 1099s Form in QuickBooks Desktop.
Before you move further by printing the 1099 form in QuickBooks Desktop, you must check whether you have e-filed your check. Herein, we have described the process for before and after e-filing taxes. Use accordingly.
Instance 1: E-File Your 1099s Form Already
If you have already filed the 1099 form in QBDT, follow the steps below to see the submitted forms.
- Firstly, navigate to the dashboard, opt for Forms, and then Manage Forms.
- You must pick the payer and the Tax Year on the upcoming page.
- As a result, you will see that the tax recipient and forms will be loaded on your device.
- You must hit the drop-down menu; you need to pick an action that is to be performed by the individual recipient.
- At last, you can print the 1099s form successfully to accomplish your task.
Instance 2: You haven’t e-filed your 1099s form Yet.
If the user hasn’t e-filed the 1099 form with Intuit, you must file it independently. However, in certain cases, users must file the 1099s form with the IRS for some states. Furthermore, follow the steps below to file the 1099 taxes manually.
First Step: Be Prepared with the 1099 Paper
The users need to buy the 1099 kit in the middle of January so you can print them properly. During the preparation, one must remember the IRS filing and contractor delivery deadlines.
Second Step: Print Your 1099 Form
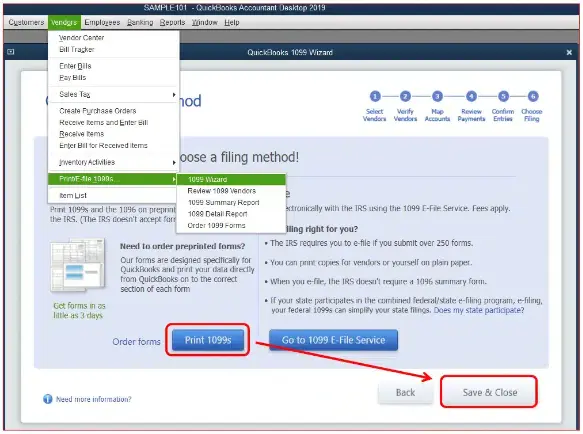
- To begin the process, move to Vendors and choose the 1099s forms.
- Afterwards, navigate to the Print/E-file 1099 Forms and then construct the 1099 form.
- Browse to the Choose a Filing Method window, wherein you must choose the Print 1099-NEC or Print 1099-MISC option.
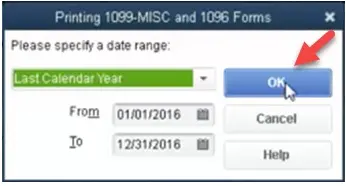
- You must pick the appropriate Date Range for the forms and tap the OK button.
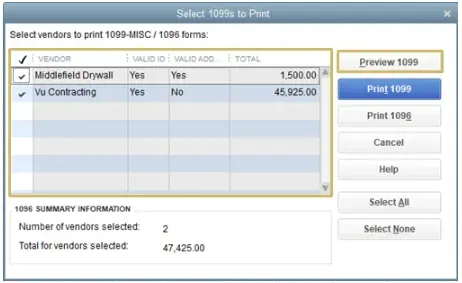
- The users must choose all the vendors they need to print 1099s forms.
- Furthermore, browse the Print 1099 form, cross-check your printer settings, and click the Print option.
Learn More- How to Easily Print Pay Stubs in QuickBooks Desktop & Online?
How to Print Form 1099 in QuickBooks Online? Here’s What to Do.
Follow the entire procedure explained below to print form 1099 in QuickBooks Online seamlessly
Stage 1: Prepare Your 1099s Form
- Primarily, move to the Payroll option and then choose the highlighted Contractors option.
- Afterwards, you must select the Prepare 1099s option and then proceed further.
- Verify that you have added the correct company name, email address, and Tax ID is accurate. Also, the information must tally with the one found on tax notices or letters from the IRS. Later on, opt for the Edit menu to make the desired changes.
- Following this, move to Confirm and Get Started option > Select Accounts option. Then, you need to confirm the accounts are used for 1099 expenses or payments and hit the Add option.
- Afterwards, besides every account you have added, opt for the 1099-NEC or 1099-MISC boxes displaying the payments made to the contractors this year.
- Thereon, navigate to the Tracked for 1099 tab and select the checkbox next to every contractor want to get a 1099 form.
- However, if you notice that the contractor is missing, choose the Not Tracked for 1099 tab. Later on, pick the Add to Tracked list to include the contractor in the Tracked for 1099 tab and then hit the Back option.
- You should check the Reportable total amount for every contractor you choose and tap the Next button.
- In the next step, tap the Preview option to look at every 1099 form and check the amount entered in each box. Thereon, opt for the Continue to 1099-MISCs option to check your 1099-MISC forms and hit the Next button.
- Subsequently, choose Continue to E-file for e-filing your 1099 form.
Stage 2: E-filing Of Your 1099 Form
Once you have reviewed all the information and verified that it is correct on your 1099 form. After this, you must e-file the 1099 form using the steps below.
- After creating the 1099 form, pick the e-file option and verify your 1099 form.
- Thereon, you must follow the instructions on the screen to complete your 1099 e-file. You can easily check every contractor’s 1099 form if asked to include the billing details.
Stage 3: Review Your Filing Status
Once the users have filed the 1099 form with the IRS, Intuit will email you regarding your filing status.
- To check the filing status in QuickBooks, navigate to Taxes, followed by the Settings option.
- Now, you must review the status of e-filing from the Filing Status section. Following is the status you will notice, along with its description.
- Not Submitted:- It represents that you haven’t e-filed the 1099-NEC or 1099-MISC forms with the IRS. The users may continue revising the same.
- Submitted:- This mainly showcases that you have e-filed the form with the IRS.
- Received by IRS:– It reflects that the IRS has already received your form, and they are either processing it or already processed and approved. The customers who have previously submitted the 1099 form will eventually get a confirmation email one week after the IRS accepts and confirms the submission.
- Conclude the process by choosing the View 1099 option to review the PDF copy.
Read More- How To Fix PDF And Print Problems In QuickBooks Desktop?
Stage 4: Print Your 1099 forms
For printing the 1099 forms in QuickBooks Online application, you first need to verify whether you have already e-file your form or not.
If you haven’t E-filed your 1099 Form
- The users must move to the Taxes option, followed by 1099 filings.
- After this, opt for the View 1099 to look for your PDF copy.
However, you must consult with the experts to obtain a copy if you don’t see the archived or earlier filed 1099 form.
If you have E-File Your 1099 Form
- Initially, you must get a 1099 kit in mid-January and ensure you file it before the deadlines.
- After this, you must print your 1099 form by following the steps below.
- You must choose the QuickBooks Online and Contractor payments with the QuickBooks Online application. For that, move to Payroll and pick the Contractors option.
- Thereon, hover your cursor over the Prepare 1099s to establish your 1099 form.
- Once done, browse to the Print and Mail instead option to go further.
- You must act according to the instructions given on screen to verify your alignment and print your forms.
Read Here- How To Reprint W2 Forms In QuickBooks Desktop & Online?
How to Print 1099s Form with QuickBooks Contractors Payment?
Review the instructions below to print the 1099 form with QuickBooks Contractors Payment.
Stage 1: Include Your Contractors and Payment
For instance, if you are utilizing QuickBooks Contractors Payments to make the payments for the entire year, users should generate a 1099 form.
1.1 Know how to Record Contractor Payments in QuickBooks Online
Wondering how to record contractor payments in QuickBooks Online? Fret Not!! Instead, implement the steps instructed below to get the desired outcome.
- Primarily, move to the Expenses tab and then choose the Contractors option.
- You must pick the contractor you desire to include in the payments and proceed further.
- After that, tap the Pay With Direct Deposit drop-down menu and opt for the Create Expense option.
- The users are supposed to include the details for the previous payment and then go for the Save and Close option.
1.2 Making the QuickBooks Contractor Payments Without QuickBooks Online
1.2.1 To include QuickBooks Online Contractor Payments one at a time.
- To commence with, navigate to Contractors and then pick the Contractors option.
- Pick the contractor you wish to include the payment for, and then move ahead.
- Click on the Pay with Direct Deposit drop-down menu and opt for Write Check.
- Add all the information accurately for the fast payment and hit the Save button.
1.2.2 To list multiple Contractor Payments QuickBooks Online at one single time.
- In this process, tap the Contractors > Overview > Record Payments option.
- After this, you must opt for the contractors you wish to add the payments to.
- For those contractors you have picked, you must appropriately include the information related to their past payments.
- Once you have paid every contractor, use the Record Payments option twice.
Stage 2: Preparing Your 1099s Form
- To begin the process, you must apply the steps according to the product you are using.
- For Contractor Payments with QuickBooks Online, you must choose Expenses and then Contractors option.
- Conversely, for QuickBooks Contractor Payments only, you must tap the Contractors and then Contractors option.
- Thereon, navigate to the Prepare 1099s option and check that you have included the correct company name, email ID, address, and tax ID. Then, you must tally the same information with the one mentioned on the tax notices or letters from the IRS.
- Subsequently, choose the Confirm info, get started, and click the Select Accounts tab.
- You are supposed to pick those accounts you use for 1099 expenses or payments and click the Add button.
- Following this, browse to the 1099-NEC or 1099-MISC checkboxes, which display the type of payments made to contractors in the present year.
- Select the checkbox next to every contractor you must obtain the 1099 form.
- If you spot that the contractor information is incomplete, go for the Not Traced for 1099 > Add to traced list to include the contractor to traced for 1099 tab.
- Cross-check the amounts listed in the Reportable Total amount column for every contractor you have chosen and hit the Next button.
- Thereon, choose the Preview option to look at every 1099 form and to check out the amounts included in every box. Later on, move to the Continue to 1099-MISCs to look for your 1099-MISC forms.
- You must go for the Continue to E-file to e-file your 1099 form.
Stage 3:- E-Filing Of Your Taxes
To e-file your taxes, you must use the steps mentioned earlier in QuickBooks Online.
Stage 4: Review your Filing Status
The steps to verify your filing status are the same as mentioned in the previous QuickBooks version.
See More- QuickBooks Desktop 2023 – Features, Pricing & More
Stage 5: Print Your 1099 Form With the QuickBooks Online Payroll Contractor Payments
5.1 Steps to follow if you haven’t e-filed your 1099 form
- To begin the process, navigate to the Taxes option and pick 1099 Filings.
- After this, you must choose the View 1099 tab to see a PDF copy.
5.2 Steps to follow when you have e-filed your 1099 form
- The users must get ready with the 1099 kit by the middle of January so that they can print the form easily.
- After this, the users of QuickBooks Contractors must choose the 1099 Filings option.
- Thereon, pick the Prepare 1099s option to generate your 1099 form and move further.
- Once you are all set, browse to the Print and Mail instead option.
- Finally, act according to the instructions on the screen to test your alignment and print your form.
5.3 How to Print Your 1096 Forms in QuickBooks Online
- To print the 1096 form in QuickBooks Online, navigate to the Expenses menu and hit the Vendors option.
- After this, choose the Prepare 1099 option and include the information appropriately for the tax year.
- Thereon, opt for the Print and Mail option and then hit the 1096 Form option. However, if everything seems to work well, choose the “”Yes, looks good!”” option.
- In the next step, choose the highlighted Print on a 1096 Form.
- For instance, if you want the form aligned, hit No; it doesn’t line up, and hit the Next button.
- At last, re-select the 1096 Form and then opt for the Print on a 1096 Form.
How do you print the previous year’s 1096 form in QuickBooks?
You must implement the steps below to print the previous year’s 1096 form in QuickBooks.
- To start the process, navigate to the File menu and pick the Print Forms followed by the 1099s/1096 form.
- After that, you will be redirected to the 1096 wizard, wherein you must choose the Get Started option.
- Thereon, pick all of your 1096 vendors and hit the Continue button after verifying all the 1096 vendor’s details.
- You should map your accounts, edit thresholds if required, and hit the Continue button. you need to click on this link
- Go through all the payments you made for the exclusions and tap the Continue button.
- Once you pick all your 1096 vendors, hit the Print 1096 button.
- Then, you need to cross-check your printer settings properly and choose the Print option.
Concluding The Post!!
Users can now easily print form 1099 and 1096 in QuickBooks using the procedure in this post. If you still need help printing the forms or need some extra information, consult our professionals at Call Us : +1-888-209-3999 . They will offer useful tips to resolve all your queries within the shortest time possible.
Frequently Asked Questions
The due dates of filing the 1099 forms in QuickBooks may differ for these forms.
- The users must file the form 1099-NEC by January 31.
- On the other end, the due date of Form 1099-MISC while filing electronically is March 31.
Any person or entity can e-file the form 1099 with the IRS, fulfilling the basic eligibility.
- Large businesses
- Software Developers
- Third-party filers
- Transmitters
- Tax-exempt organizations
- Government agencies
- Individuals and Small Businesses
Yes, in QuickBooks Online, the users can create and file the additional 1099s form if they have previously filed the 1099 form.
You must consider the points to print the 1099/1096 form in QuickBooks.
- You must print separate copies rather than printing altogether using a page-oriented printer.
- For the proper alignment, you must choose -1 to bring the print down.
- It is suggested that the users won’t collect their pre-printed forms to insert them in their printer. You must upload all the copy-1 forms, and once it prints the copy of all vendors, then print copy-2.
If you are having difficulty printing forms 1099 and 1096 in QuickBooks, you must connect with our professionals anytime via live chat.

