QuickBooks Desktop application is a top-notch accounting software that offer the multi-user mode feature that enable more than users to access the same data file at the same time. But, sometimes, the users won’t be able to use this feature, resulting in QuickBooks Error Code H202. This error is mainly triggered due to improper hosting configuration or damaged network files.
Consequently, the error H202 QuickBooks prevents the users from working in multi-user mode and hampers the workflow. So, it is mandatory to overcome this error using the troubleshooting methods explained in this post. Thus, it would help the users to resume their tasks smoothly without any discrepancies.
Are you having difficulty working in multi-user mode due to QuickBooks Error Code H202? Well, in that case, ring us at Call Us : +1-888-209-3999 and connect with our highly-certified professionals for sure-shot solutions

What Exactly Do You Know About QuickBooks Error H202?
Most of the time, the users might end up with QuickBooks Error H202 when multiple users try to access the same data file in a multi-user environment and QuickBooks fails to communicate with the server. Usually, when the error occurs, the following error message flashes on the screen stating:

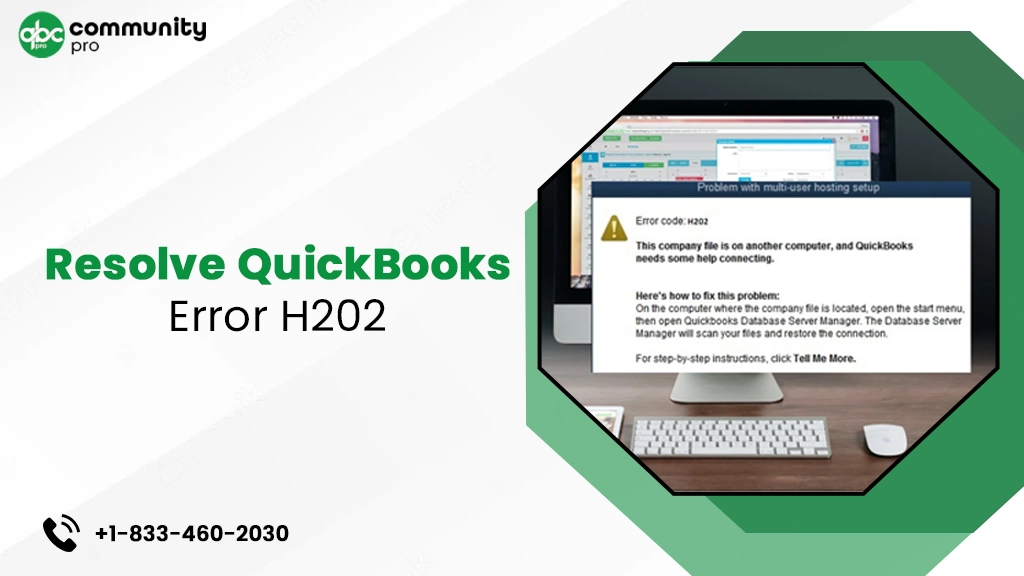
“Error Code: H202
This company file is on another computer, and QuickBooks needs some help connecting”.
You mainly see this error due to a corrupted company file or connection error. To get this issue resolved, you first have to understand this error and then look for the resolution methods to fix it.
Why Do Users Experience QuickBooks Multi-User Mode Error H202?
Whenever the users confront QuickBooks multi-user mode error H202, they might think about the possible causes of the error. Therefore, to shed some light on the factors responsible for the error, we have described some in detail below. So, have a look at them below to get a better understanding of the issue. ‘
- The users might face difficulty while running the QBCFMonitorservice on their computer.
- In some instances, the problem from the end of the firewall also prevents the users from accessing the data file in multi-user mode.
- Sometimes, the inappropriate hosting settings of the QuickBooks application could also result in Error H202 in QuickBooks.
- in some cases, this issue may appear when some of the QuickBooks services are inactive or disabled on your server.
- Inappropriate DNS settings could also be one of the reasons that trigger QuickBooks Error H202.
- There may be some damage or corruption in the QuickBooks data file.
How Could You Determine the Occurrence of H202 Error In QuickBooks Desktop?
In this blog’s section, we have explained all the signs and symptoms that will help you identify the H202 Error in QuickBooks Desktop. Let’s have a look at them.
- The users might observe that their system began to freeze within every couple of seconds.
- In other instances, you may notice the poor performance of your Windows operating system.
- You might encounter problems while working in a multi-user environment.
- Moreover, the users starts getting the error message on their computer screen as described above.
- The QuickBooks Desktop application will freeze or crash frequently.
Read More- QuickBooks Keeps Crashing? Learn How To Solve The Problem
Effective Ways to Eliminate QuickBooks Error H202 switching to multi-user mode
Are you looking for the proper way to figure out the QuickBooks Error H202 by switching to multi-user mode? If yes, then your search part comes to an end here and you don’t have to worry any longer. Herein, we have described all the best possible solutions to tackle this multi-mode error easily.
First Measure:- Ping Your Server From the Workstation To Verify the Connection
The users are supposed to ping your server from each workstation confronting QuickBooks Error code H202.
Switch-On The Network Discovery On your Server Computer
- To begin the process, the users have to hit the Windows key and insert “Network” into the text area.
- After this, you must launch the Network and Sharing Center, followed by the Change Advanced Sharing Settings option.
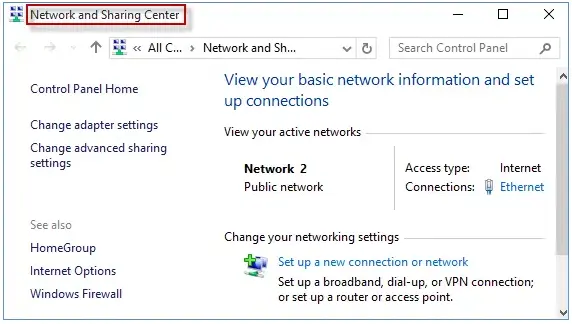
- The users must verify that the “Turn on network discovery” option is chosen from the Network Discovery and File and Printer Sharing section.
Acquire Your Server’s Name
- Begin the process by opening the Run Command window on your screen. You can use the shortcut keys i.e.Windows + R keys, together to open the run window.
- Afterwards, insert the “CMD” command into the search panel and hit Enter to proceed further.
- In the Command Prompt window, you must add “ipconfig/all” and press the Enter key.
- Now, you must search for the Host Name from the Windows IP Configuration window, and it will show your server anime on the right.

- Thereon, you have to note down the server name at a safe place where you can find it easily.
Testing Of Your Server
- First of all, you must launch the Run Command Prompt window on your computer screen.
- Thereon, insert the “CMD” into the search box to open the Command Prompt window on your system.
- Within the upcoming screen, you must include “ping [ your server name] and hit Enter key. Herein, it would help if you cross-checked that you haven’t used the brackets around your server’s name.

- The users must follow the same procedure on every workstation with QuickBooks Error code H202. If you receive a reply for every packet with the no loss message, it states that your server works well. On the other hand, if it displays packet loss or a very slow reply, you have to get IT experts’ help to fix the network issues.
Second Measure:- Monitor The Services on the Host Computer
- Initiate the process by launching the Run Command window on the screen.
- Thereon, include the “Services.msc” command into the search column and hit the OK button to open the Services window.
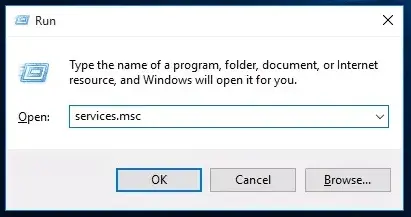
- After this, scroll down to the list of services and double-tap on the service named QuickBooksDBXX. Herein, you will see that the XX will display the QuickBooks version you are using currently.
- Go to the Startup Type column and hit the drop-down menu to pick the Automatic option.
- Moreover, the users must verify that the Service Status is either fixed to Running or Started.
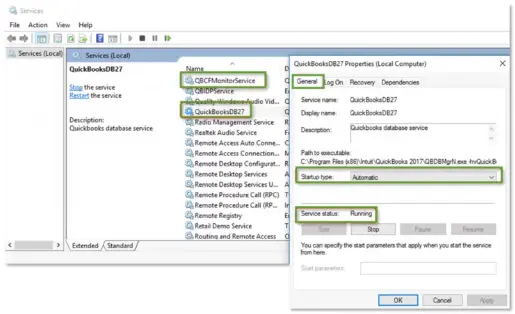
- In the next step, hit the Recovery tab and then move further.
- Following this, choose Restart the Service from every drop-down menu i.e. First Failure, Second Failure, and Subsequent Failures.
- Afterwards, hit the Apply button followed by OK to save the mandatory changes.
- Finally, you are supposed to carry on with the same steps for QBCFMonitorService.
Third Measure:- Try Running the QuickBooks Database Server Manager
If you still receive the QuickBooks Error code H202 on your computer, try running the QuickBooks Database server manager on your device.
- Initially, hit the Windows key to open the Start menu and add “Database” into the search area.
- Afterwards, you must use the QuickBooks Database Server Manager option and look for the data file folder.
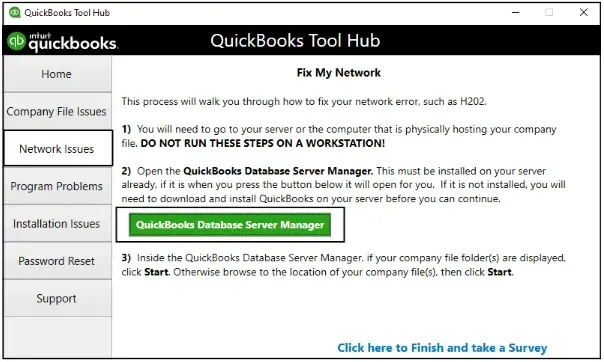
- Once you get the folder, open it and hit the Scan option to move further.
- Thereon, you must resolve the firewall setting with the QuickBooks Database Server Manager.
- You must click the Close icon once you finish the scanning process.
- After that, launch the QuickBooks application on every workstation, and you get the error.
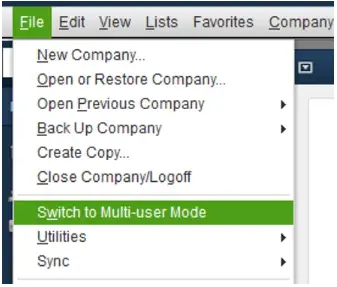
- Move to the QuickBooks File menu and hit the highlighted “Switch to Multi-User Mode” option.
Fourth Measure:- Do the Necessary Changes to Windows Hosts File
The Windows host file contains all the relevant details about the network configuration, including details of the IP address and the workstation linked to the network.
If the information within the Windows host file is incorrect, it won’t allow the workstation to link with the server. Thus, it might give rise to the QuickBooks Error code H202. Therefore, to fix the issue, it is necessary to make the relevant changes within the Windows host file.
- In the first step, open the Command Prompt windows by typing CMD in the Run window.
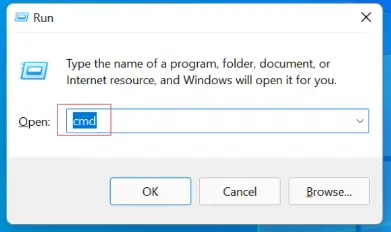
- In the CMD window that opens on the screen, insert “ipconfig” and hit the Enter key to move further.
- Consequently, it will show the name of the IP address (IPv4) and the Host Name. The users are supposed to note it down on the Notepad on their computer.
- Thereon, you have to gather the same details from all the workstations linked with the network.
- You must click on the Close QuickBooks icon it it’s already running on your device. Later on, navigate to the following folders to acquire the host file.
- C: >> Windows >> System32 >> Drivers >> Etc.
- C: >> Windows >> Syswow64 >> Drivers >> Etc.
- The users must launch the host file and choose the Notepad option if asked to select the application.
- Following this, include the IP Address and the system name in the file. Then, use the Tab keys to add any spaces in your text.
- Moreover, the users must confirm that they have a server system with all the workstation details. Also, every workstation must have all the relevant details of the server computer. The details must consist of all the details of the IP address and system name.
- Furthermore, press the Ctrl + S keys together to save the necessary changes and then copy the file.
- Finally, you must change the name of the original Host file by including .OLD at the end of the file name. Later, you must save the file with “hosts” in the folder.
Fifth Measure:- Construct a New Folder For the QBW File
Sometimes, the damage in the QBW file might be responsible for the h202 QuickBooks error. So, to rectify the issue, you must generate a new folder for the QBW file with the help of the procedure explained below.
- First of all, you must generate a folder on the server computer.
- After that, shift the QuickBooks data file to a newly generated folder after assigning the proper permissions.
- Thereon, launch the data file in multi-user mode from the new folder to ensure that the original folder is damaged and you must build one.
- However, if you won’t be able to establish a company file from the new folder, it represents that the issue is with your data file.
- Conversely, if you can easily open the company file from the new folder, it signifies that the problem is with your data file itself.
Sixth Measure:- Resolve the Issues With QuickBooksDBXX and QBCFMonitorService
If the users can’t access QuickBooks services such as QuickBooksDBXX and QBCFMonitorService properly, they won’t be able to run the data file in multi-user mode properly. Therefore, to fix the issue, it is necessary to make the relevant changes to these services using the steps listed below.
- Initially, access the folder that carries your data file and right-click on it.
- Afterwards, navigate to the Properties option, followed by the Security tab.
- Thereon, choose the Advanced tab and then opt for the QBDataServiceUserXX.
- In the next step, hit the Edit menu and ensure you have set the preferences to Allowed for the following settings.
- Traverse Folder/Execute File
- List Folder/Read Data
- Read Attributes
- Read Extended Attributes
- Create Files/Write Data
- Create Folders/Append Data
- Write Attributes
- Write Extended Attributes
- Read Permissions
However, if the settings are not set appropriately, go through the following points.
- In the first phase, right-click on the company file folder and opt for the Properties option.
- Afterwards, hit the Security tab and click the Edit menu to proceed.
- In the next step, you must opt for the QBDataServiceUserXX and then fix it to the Full Control option.
- Thereon, hit the Allow button and then save the changes by clicking on the Apply button.
Seventh Measure:- Utilize the QuickBooks File Doctor Tool to repair the damaged data file
You must perform the following steps outlined below to repair the damaged data file with the QuickBooks File Doctor Tool.
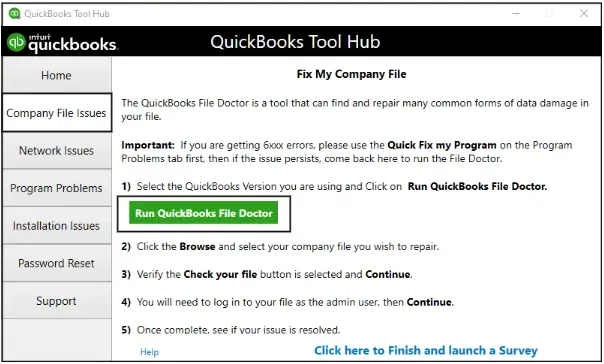
- Before you use the QuickBooks File Doctor tool, confirm that you have downloaded the most currently launched version of QuickBooks Tool Hub on your device.
- After this, open the QuickBooks Tool Hub, pick the company file issues tab, and launch the tool.
- In the next step, pick the company file from the drop-down menu. However, if you can’t get the file, hit the Browse option and locate your data file.
- Once you are done, select the checkbox beside your company file and select the Continue button.
- Conclude the process by adding the correct QuickBooks admin password and tapping the Next button.
Eighth Measure:- Run the Latest Version of QuickBooks Install Diagnostic Tool
To repair the issues with installing QuickBooks Desktop, you must try to to run the QuickBooks Install Diagnostic tool by performing the steps below.
- Initiate the process by downloading the latest QuickBooks Tool Hub on your device.
- After this, you must scan the folder where your company data file is located and proceed further.
- Thereon, you have to note down the IP address and the network interfaces shown on the screen.
- Turn on the QuickBooks ports if the Firewall section includes an Open Ports tab.
- You must continue the process by testing the data file connectivity.
- In the end, launch the data file to verify whether the issue is resolved.
Ninth Measure: Configure the Permissions on Windows to Host the Data File
Follow the process described below to configure the permissions on Windows to host the data file.
- In the first place, move to the File Manager and move to the folder that carries the data file.
- After that, right-click on the folder and pick the highlighted Properties option.
- Thereon, you must hit the Sharing option followed by the Share Add option.
- You must go with the QuickBooksServiceUserXX service for your QuickBooks version and assign Full Control access to both users.
- End the process by hitting the Share option to end the process.
Tenth Measure:- Assign a Different Name to .TLG and .ND Files
Changing the name of the .TLG and .ND files might help the users resolve the QuickBooks error code h202 switching to multi-user mode. Follow the procedure given below to change both file names accurately.
- Before you start the process, ensure that the QuickBooks application is closed.
- After that, the users must open the data file folder on their device and look for the .TLG file.
- Once you get the .TLG file, right-click on it to choose the Rename option.
- Thereon, you must add .OLD at the end of the filename and press the Enter key to proceed further.
- You must apply the same steps with the .ND file and then shut down the folder.
- Now that you have completed these steps for both, then the .TLG and .ND files will be generated automatically.
- Finally, you must launch the company file and press the Alt key until the file opens on your workstation.
How Can You Resolve QuickBooks Error H202 while using Windows Server 2021 Essentials R2?
If the users receive QuickBooks Error H202 while accessing the Windows Server 2021 Essentials R2, they must use the following resolution methods to fix the issue.
Stage 1: Look Into Your Server Version
To verify which server version you use, open the Windows Start menu and go to the Settings menu. After this, move to Systems and then About. Thereon, it will display the server name written within the About section.
Stage 2: Install QuickBooks Database Server Manager
If you haven’t previously installed the latest QBDBMgrN version on your server for every QuickBooks version you are accessing, then you need to install them. You have two different ways to set them up, which are as follows;
- The Full Program option:- You must go with this option if you have a full version of QBDT and QBDBMgrN installed on the server computer.
- The Server-Only Option:– If you only access the QBDBMgrN on the server computer, then go with this option.
Stage 3: Relaunch Your Base Filtering Engine Service
To relaunch the Base Filtering Engine service, you first have to stop the service. After this, you must scan your QuickBooks files and try to start the base Filtering Engine Service again on your device.
How to Fix Error H202 QuickBooks when hosting company files on a Non-Windows Server?
Sometimes, the users might encounter Error H202 QuickBooks while accessing the data file hosted on Fedora Linux or Citrix server. This issue mainly arises while using a 64-bit version of Linux. Moreover, whenever the error occurs, it starts throwing the following error message on the screen:
“Problem with multi-user hosting setup. QuickBooks could not open the file in multi-user mode.”
Resolution Methods to Fix the Error
To rectify this error, the users must try to apply these troubleshooting methods.
- Include the server’s fully qualified domain name
- Change the QBGlobalAppConfig.ini file on the Fedora Linux Server
- Try to generate a mapped drive
To Summarize The Above!!
Through this comprehensive guide, we hope that now easily eliminate QuickBooks Error Code H202 and work in multi-user mode smoothly. If you still have any further doubts, you can connect with the professionals at Call Us : +1-888-209-3999 and figure out the issue as soon as possible within the shortest time possible.
Frequently Asked Questions
To prevent Error H202 from occurring in the future, you must keep the following things in mind.
-
- You must try to refresh the QuickBooks Database Server Manager on your device.
- Also, you must do the proper settings of the firewall to ping the server.
- =””>=””>=”yoast-text-mark”>=”color: #0e101a;”>Moreover, you must include the server’s IP address in the Windows host file.
- After the verification, the users must also mention the system’s services to the Windows Admin Group.
The users can figure out the QuickBooks Error H202 by turning off the multi-user access option on the workstations.
The users can test that the firewall is interrupting access to the data file by switching off the firewall temporarily. Then, try to access the data file and verify whether the issue is resolved.
In order to resolve Error H202 in QuickBooks, you must include the following ports in your firewall settings.
- TCP Port 8019- You must include this port for the QBDT version year 2018 or later.</li&amp;gt;</li>
- <span style=”color: #0e101a;”>TCP Port 56728- However, the users can add this port to the QBDT version year 2017 or later.
Whenever the users come across QuickBooks Error H202, they won’t be able to access their data file in multi-user mode. Thus, it affects the workflow and prevents the users from resuming the ongoing process.

