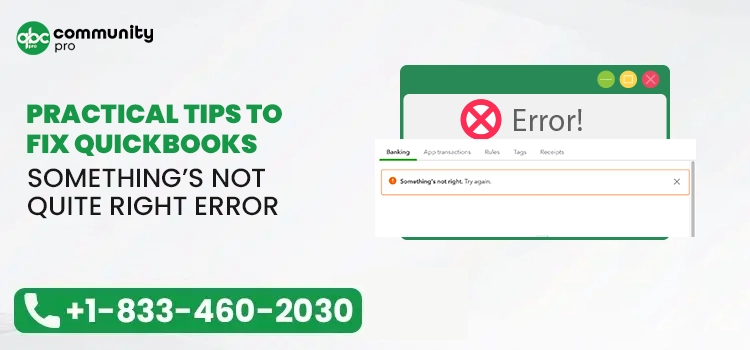
Isn’t it quite depressing when trying to create an expense, QuickBooks Something’s not quite right error flashes on your screen? Are you thinking about how to figure out this error? If such questions bother you, then you are at the right place. In this comprehensive post, we have discussed all the best solutions to fix the error within no time.
The users might experience Something’s not quite error in both QuickBooks Desktop and QuickBooks Online due to issues with their web browser, such as browsing history or cache files. In other instances, it may appear while using the older version of QuickBooks. However, if you are also struggling with the error, then get it fixed using the solutions discussed further in this post.
Do you find the troubleshooting methods to fix QuickBooks something’s not quite right error bit challenging? If yes, call us at Call Us : +1-888-209-3999 and relieve the stress from your shoulders to fix the problem.
Different Error Messages You See When QuickBooks Something’s Not Quite Right Error Emerges
Upon the arrival of the QuickBooks Something’s Not Quite Right error, you might notice any of the following error messages:

OR
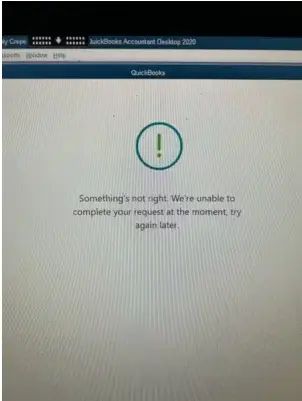
| “Something’s not quite right. Unexpected token < in JSON at position.” |
| “QuickBooks something’s not quite right metadata is not defined.” |
| “Something’s not quite right delete expense QuickBooks Online.” |
| “Something’s not quite right please balance debits and credits QuickBooks.” |
Why Do I End Up With Something’s Not Quite Right Error in QuickBooks?
The users might encounter something’s not quite right error in QuickBooks for various reasons. Therefore, to make you aware of all the factors responsible for the error, we have described them below. Check them out and try to look for the issue generating the problem.
- The users might get stuck with the Something’s Not Quite error in QuickBooks when there is some problem with the web browser you are working on.
- Sometimes, this problem might occur when you attempt to include a payment with an inappropriate account.
- It may happen when you notice the session has expired and the application needs you to sign in again.
- You might discover the error when you are trying to save, modify, or want to void an invoice in QuickBooks.
- The presence of wrong characters in your QuickBooks Online company file name is the reason behind Something’s not quite right error when updating the company’s direct deposit.
Pre-Measures to Rectify QuickBooks Something Not Quite Right Error
There are certain measures that you must keep in mind that you must consider before resolving QuickBooks Something not quite error. Read all of the pointers carefully.
- It is mandatory to schedule the regular backups of the essential QuickBooks data. However, it will help keep sensitive information safe and make recovery easier.
- Another important thing is you must install the QuickBooks updates regularly. Installing the updates on time will help improve the performance of your accounting software and add more security features.
- Also, you must check that your device is well-connected with an uninterrupted internet connection.
Resolving QuickBooks Desktop Something’s Not Quite Right Error
In this blog section, we have discussed all the effective solutions to rectify QuickBooks Desktop something’s not quite right error.
1. Setting Up of QuickBooks Desktop Updates Once Again
- Start the process by opening the QuickBooks Desktop on your device and clicking the Help menu.
- Now, beneath the Help tab, you must pick the highlighted Update QuickBooks Desktop option.
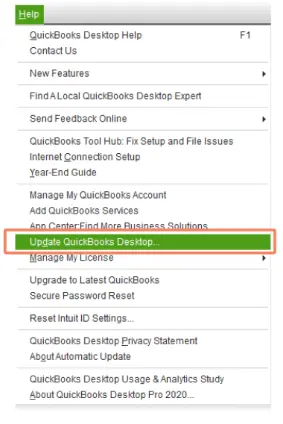
- Following this, opt for the Update Now tab and ensure you have marked the checkbox of Reset Updates.
- Afterwards, choose the Get Updates option, and once the downloading part is done, close the QuickBooks Desktop.
- Once again, click the highlighted Update QuickBooks Desktop from the Help tab.
- In the end, hit the Overview tab and then the Update Now option.
Related Article- Update QuickBooks Desktop
2. Put Verify and Rebuild Data To Use For Repairing the Company Data
With the help of the QuickBooks Rebuild Data tool, you can easily fix the issues with your company file data. To run this tool, you must carefully review the instructions written below.
- In the first place, launch the QuickBooks Desktop and tap on the File menu from the left side of the application.
- Afterwards, hit Utilities > Verify Data and then move ahead.
- If the QuickBooks doesn’t find any issues, it signifies no problem with your data file.
- On the other side, if QuickBooks spots that the data has lost its integrity, you must rebuild the damaged data.
- Thereon hit the File menu > Utilities > Rebuild Data option.
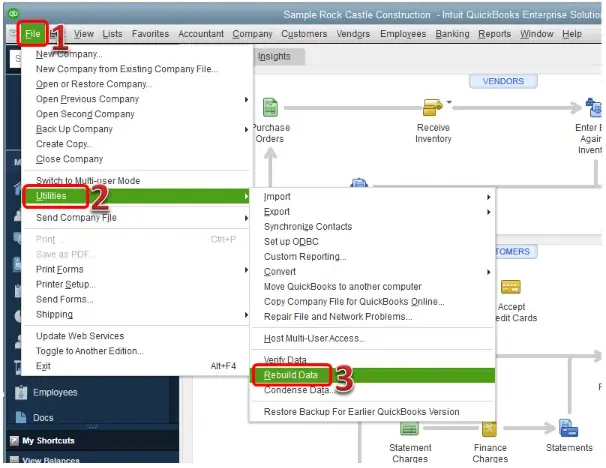
- Before you try to rebuild the data, QuickBooks will prompt you to generate the backup of your company data and then save it. Herein, you must remember that you mustn’t change the name of the previously created file. Apart from this, you must allot a new name to the latest created backup file and hit the Save button.
- Finally, tap the OK button once you receive the Rebuild data message on your computer screen.
Fixing QuickBooks Online Error Something’s Not Quite Right
If you get the QuickBooks Online Error Something’s not quite right, then you must carry on with the following instructions.
1. Try Running QuickBooks In an Incognito Window
Sometimes, running the QuickBooks Online application in an incognito mode, that is, the personal window, helps users resolve the issue. You must perform the steps below to run the software in incognito mode.
- Firstly, you must open Google Chrome web browser on your device and then tap on the three vertical dots.
- From the extended list of options, pick the New Incognito window option.
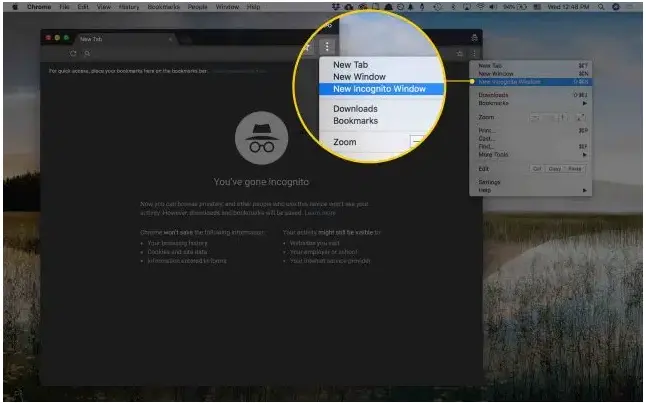
- Once you see the Incognito window, you must try to perform the same operations in QuickBooks Online within the same window.
2. Remove the Unnecessary Cache and Browsing History
The unnecessary storage of the cache files and cookies might stop the users from logging into the QuickBooks Online application. Therefore, removing the browsing history using the steps below is essential to avoid the QuickBooks, Something’s Not Quite error.
- Initially, you must open the internet browser to run the QuickBooks Online application.
- Afterwards, open Google Chrome and hit the three vertically placed dots from the top right corner.
- In the next step, browse from the list of available options and choose the Settings menu.
- Following this, hover your cursor over the Clear Browsing Data and move to the Privacy and Security section.
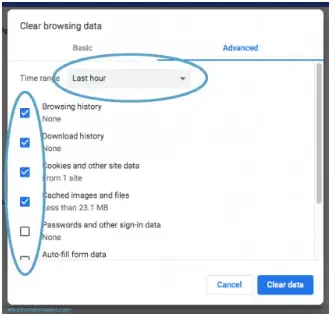
- Thereon, browse to the Cache and Cookies and remove all the browsing data to clear the unwanted browsing history. Moreover, you also have to choose the period from when you wish to remove the history.
- However, if you are working on the Safari browser, first launch the browser on your device and then tap on the menu.
- Next, you must choose the Reset Safari option and check all the website data.
- In the end, you must clear all the browsing history and then try to open the QuickBooks to see whether the issue is resolved.
3. Resetting of the QuickBooks Application Data
Apply the steps described below to reset the QuickBooks application data.
- Primarily, hit the Windows key on your keyboard and choose the Settings option.
- Afterwards, hover your cursor over the System option and pick Apps and Features from the following window.
- As a result, you will see that the App section will open on your device.
- Furthermore, move to the Advanced Options to reset the data.
- Conclude the entire process by hitting the Reset option.
Resolve Something’s Not Quite Right QuickBooks Desktop Direct Deposit Error
Sometimes, the inlaid characters in the company file name might be one reason for server errors or other problems. However, if you end up with Something’s not quite right while updating companies’ direct deposit, follow the steps below.
- To remove the invalid characters, move to the Settings menu.
- After this, choose the highlighted Company Settings from the left side menu.
- In the next step, tap the Edit menu from the Company Name section.
- Thereon, you must delete the invalid characters and then proceed further.
- End the process by hitting the Save button followed by the Done option.
- At last, you must try to run the QuickBooks Online application after removing the invalid characters and verifying whether the issue is resolved.
Concluding The Post!!
We understand it gets quite annoying for the users when they get stuck with QuickBooks Something’s not quite right error while working on some important work. However, we hope you find this post worth reading and helpful in resolving the error effortlessly. If you have any further queries, contact our professionals anytime at +1-833-460-2030 and get the best assistance possible.
Frequently Asked Questions
The users can resolve QuickBooks something’s not quite right error with the help of the QuickBooks Install Diagnostic tool.
- Ensure you have downloaded and installed an updated version of QuickBooks Tool Hub.
- After that, launch the recently installed version of QuickBooks Tool Hub.
- Thereon, choose the Program Problems and then click QuickBooks Install Diagnostic Tool.
- Allow the tool to run and repair the issues with QB installation and check whether the issue is resolved.
You must go through the following steps to add a category to the purchase order.
- Initially, navigate to the Vendors section from the Expense menu in QuickBooks.
- Now, you must pick the vendor and then hit the Edit button.
- Afterwards, scroll down toward the bottom of the page and visit the Accounting selection to opt for the default account.
- At last, hit the Save button to end the process.

