Installing the most recent QuickBooks Payroll tax Table Updates on the device is important when filing taxes using the QuickBooks. The latest updates make it easier for businesses to make the proper calculations supported by provincial and federal tax tables. However, to get the latest tax table update, the users have a valid QuickBooks Desktop payroll subscription to file the taxes easily.
If you are also struggling to get a proper method to get the detailed procedure to get the latest tax table in QuickBooks Desktop, this is the post you are looking for. Read this write-up thoroughly to get the complete information and calculate the taxes accurately.
Looking for immediate help to get the most recent tax tables in QuickBooks? Contact us at Call Us : +1-888-209-3999 and let our professionals handle them independently.
What to Know Before Updating QuickBooks Payroll Tax Table
Here are some essential points you must remember to get the newest payroll tax table update in QuickBooks Desktop downloaded smoothly on your device.
- Firstly, ensure that you must have a valid QuickBooks Payroll subscription to get the latest payroll tax table update.
- You must have good and uninterrupted internet access to hassle-free download the latest updates.
- Also, you are advised to get the most recent updates of tax tables within at least 45 days. Otherwise, you may also get the updates every time a payment is made to the employees.
- Apart from this, you also have to turn on the automatic updates feature within the QuickBooks Desktop. Doing so will automatically provide you with the payroll tax table updates once the updates are launched.
Read More- Best Ways to Update QuickBooks Desktop to the newest release
How to Easily Check Your QuickBooks Payroll Tax Table Version
The latest QuickBooks Payroll Tax Table Update version available for the QuickBooks Desktop 2023 edition is 11833003. This release will be effective from June 1, 2023, to December 31, 2023. However, to verify whether you have the latest payroll tax table update, perform the steps outlined below.
- Launch the QuickBooks application and tap on the Employee menu to start the process.
- After this, hit the My Payroll Service and the Tax Table Information tab.
- Thereon, you will see that the First Three Numbers represented beneath the You are Using Tax Table Version column will signify your tax table version, 118833003.
- Conversely, if you previously used the updated version of the payroll tax table, you already have release 118.
How to Get the Newest Payroll Tax Table Update in QuickBooks Desktop?
If you already subscribe to QuickBooks Payroll, you can obtain the newest payroll tax table update in QuickBooks online. However, it is important to download the latest payroll tax table update to continue filing taxes hassle-free.
Furthermore, if you are looking for the proper steps regarding how to update payroll tax table in QuickBooks Desktop, then you must carry on with the steps written below.
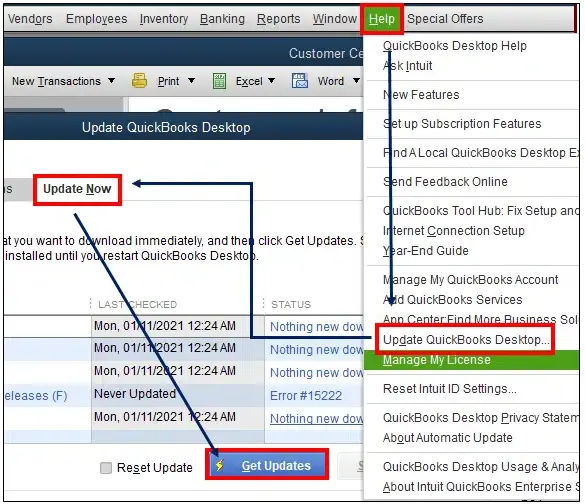
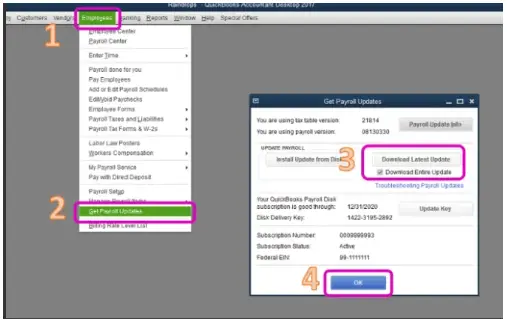
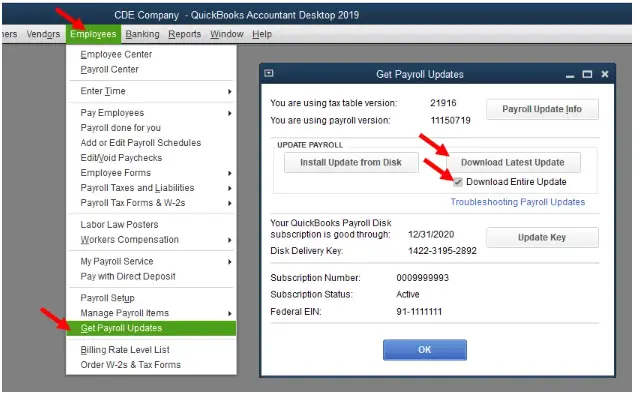
1. To commence, choose the Employees tab and hit the highlighted Get Payroll Updates option.
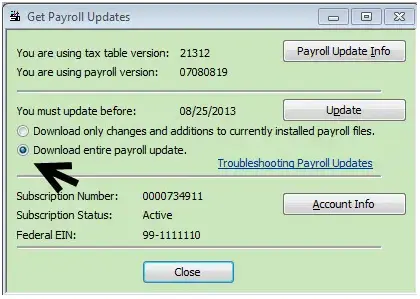
2. After this, you must navigate to the Download Entire Payroll Update option.
3. Proceed further by tapping on the Update button.
4. Once you are all set with the downloading part, you will receive a pop-up message indicating, “A new tax table and updates to your payroll tax forms have been installed on your Desktop. Click OK to read about the modification.”
5. After reading the prompt carefully, hit the OK button, and you are all set to go.
Related Article- QuickBooks Payroll Error PS038: How to Resolve and Prevent
Simple Process to Install the Most Recent Updates of Tax Tables Through CD (Disk Delivery Service)
Follow the procedure explained below to install the most recent updates of tax tables in QuickBooks through CD.
- In the initial stage, the user is supposed to insert the “Payroll Update CD” into the CD drive of your device.
- Afterwards, choose the Get Payroll Updates option to proceed to the next step.
- Thereon, the QuickBooks Desktop Professional and Premier Users have to tap on the Employees option > Get Payroll Updates option.
- In the next step, if the user is asked to find the “update.dat” or “data.file” within the “Install Payroll Update window,”. In that scenario, the users must perform the mandatory actions and then act according to the instructions given on the screen.
- Once you are all set, hit the highlighted Browse option and move towards the next step.
- Next, you must choose the CD Drive option from the Install window by clicking “Look in the drop-down arrow”.
- Furthermore, you must either opt for “date or update3.dat” from the “Payroll Update Disk” and hit the Open button.
- Now, choose any option, i.e, “update.dat” or “update3.dat” option.
- Later on, you must hit the Open option.
- Finally, move to the Payroll Update window to tap the OK button.
New Features that Are Included With the Latest Payroll Tax Table Updates in QuickBooks
With the effect of the latest update launched in July 2023, you can see numerous TD1 changes from the January 2023 payroll tax table update.
View the Current TD1, CPP, and EMI Amounts.
| Effective Date | 7/1/2023 | 1/1/2023 |
| Tax Table Version | 118 | 117 |
TD1 Amounts
Canada Pension Plan (CPP) – Outside QUEBEC
| Effective Date | 7/1/2023 | 1/1/2023 |
| Tax Table Version | 118 | 117 |
| Maximum Pensionable Earnings | 66,000 | 66,000 |
| Basic Exemption | 3,500 | 3,500 |
| Contribution Rate | 5.95% | 5.95% |
| Maximum Contribution (EE) | 3,754.45 | 3,754.45 |
| Maximum Contribution (ER)) | 3,754.45 | 3,754.45 |
Employment Insurance (EI) – Outside Quebec
| Effective Date | 7/1/2023 | 1/1/2023 |
| Tax Table Version | 118 | 117 |
| Maximum Pensionable Earnings | 61,500 | 61,500 |
| Premium EI Rate (EE) | 1.63% | 1.63% |
| Premium EI Rate (ER) (1.4*EE) | 2.28% | 2.28% |
| Maximum Premium (EE) | 1,002.45 | 1,002.45 |
| Maximum Premium (ER) | 1,403.43 | 1,403.43 |
Quebec Pension Plan (QPP)
| Effective Date | 7/1/2023 | 1/1/2023 |
| Tax Table Version | 118 | 117 |
| Maximum Pensionable Earnings | 66,600 | 66,600 |
| Basic Exemption | 3,500 | 3,500 |
| Contribution Rate | 6.40% | 6.40% |
| Maximum Contribution (EE) | 4,038.40 | 3,776.10 |
| Maximum Contribution (ER) | 4,038.40 | 3,776.10 |
Employment Insurance – (Quebec Only)
| Effective Date | 7/1/2023 | 1/1/2023 |
| Tax Table Version | 118 | 117 |
| Maximum Insurable Earnings | 61,500 | 61,500 |
| Premium EI Rate (EE) | 1.27% | 1.27% |
| Premium EI Rate (ER) (1.4*EE) | 1.778% | 1.778% |
| Maximum Premium (EE) | 781.05 | 781.05 |
| Maximum Premium (ER) (1.4*EE) | 1,093.47 | 1,093.47 |
Quebec Parental Insurance Plan (QPIP)
| Effective Date | 7/1/2023 | 1/1/2023 |
| Tax Table Version | 118 | 117 |
| Maximum Insurable Earnings | 91,000 | 91,000 |
| Contribution Rate (EE) | 0.49% | 0.49% |
| Contribution Rate (ER) (1.4*EE) | 0.69% | 0.69% |
| Maximum Contribution (EE) | 449.54 | 449.54 |
| Maximum Contribution (ER) (1.4*EE) | 629.72 | 629.72 |
Commission Des Norms Du Travail (CNT)
| Effective Date | 7/1/2023 | 1/1/2023 |
| Tax Table Version | 118 | 117 |
| Maximum Earnings Subject to CNT | 91,000 | 91,000 |
How to Fix QuickBooks Desktop Payroll Tax Table Update Errors?
Even after installing the latest QuickBooks Desktop Payroll tax table update, you notice that the TD1 amounts still need to be updated, you must carry on with the following steps.
- Initially, the users are supposed to verify that they have installed the latest QuickBooks payroll tax table update on or after the release date. For instance, if the user has downloaded the update version 118 on or after June 15, 2023. In that scenario, you won’t be able to find the tax tables until it become effective on July 1, 2023. If, after the release date, you install the updates, then you will get the latest tax table updates.
- In case you have manually made the changes in the TD1 amounts for an employee in QuickBooks, then the new table will not modify the previously added amounts. All you need to do is to include the TD1 amounts, which are going forward manually.
- There on, you must verify whether any employee has set up the TD1 amounts. This is so because the QuickBooks Desktop will automatically update those TD1 amounts for employees with the basic amounts for last year’s tax tables.
Taking Everything Into Account…
Getting the latest QuickBooks Payroll Tax Table Update is important for accurate tax filing and avoiding late tax penalties. However, we hope the above process will help you install the latest tax table updates. If you encounter any difficulty while getting the payroll tax table updates, then have a conversation with our professionals at Call Us : +1-888-209-3999 for sure-shot solutions.